Intel’s introduction of Skylake comes at a rather turbulent time in the PC market place. The PC gaming market is flourishing, virtual reality seems just a stones throw away, DirectX 12 and other low level API’s improve game performance, and High Bandwidth Memory’s introduction will power GPU’s for generations to come. But Skylake is easily one of most hyped releases this year – and not necessarily because of the performance improvements over Haswell, but because of its native support for new technologies.
On the software side of things, low level API’s such as Microsoft’s DirectX 12 are going to fundamentally shift the performance goalposts of PC gaming, with the lower processor overhead, an emphasis on efficiency and multi-threading developers will have the ability to create richer and more detailed worlds than ever before. Think of Skylake’s feature set as doing much the same for hardware – its introduction will shift the average consumer level PC to DDR4, introduce M.2 and USB 3.1 and improve the overall bandwidth available to both the processor and other components.
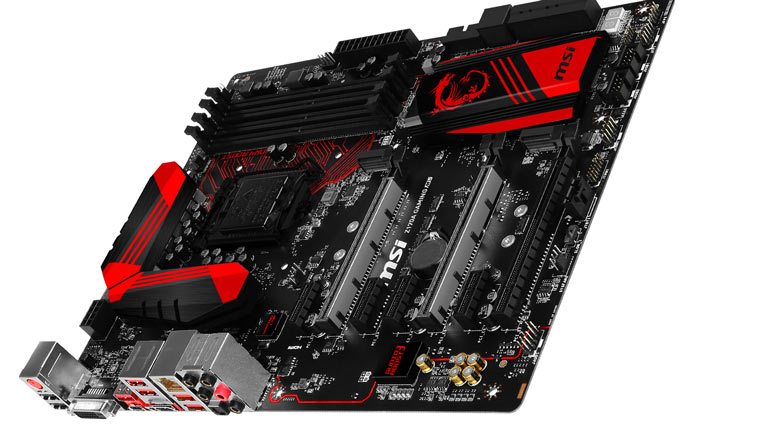
First impressions of MSI’s Z170A Gaming M5 are damn impressive. The front box art of the motherboard is simpler than most rivals (and other previous boards from MSI too), forgoing the usual slew of logos and slogans. Instead, we just get an extreme closeup of a quarter of the motherboard which shows off MSI’s infamous Dragon logo and various connectors and components of the board. The rear of the box is where MSI become more boastful of Z170A Gaming M5 capabilities, highlighting some of the more important features including USB3.1 (type A and C), DDR4 support, M.2 and Audio Boost 3; and on the top right sits a full overview of boards specifications.

Opening the box up, you’ll find the motherboard (I bet that surprised you!), drivers and utilities to get you up and running, labels for the various cables, 4 SATA cables (rather generous, a lot of boards come with only 2x), an SLI bridge, the obligatory manuals, quick install guide and thank you notes, an MSI Dragon case sticker and the I/O rear panel shield. Oh and a door hanger too which reads “I’m not here”.
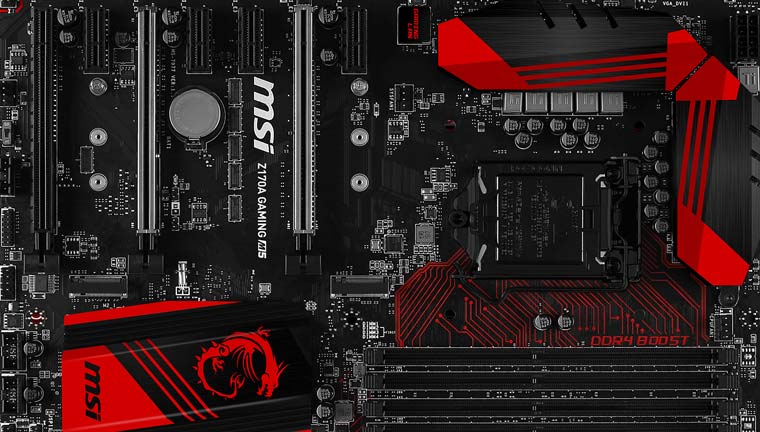
While gamer’s and power users care ultimately care most about frames per second and rendering times, if you’re building a rig you want it to at least look good. I’ve got to say, from a personal standpoint I’m a big fan of MSI’s color scheme for the Z170A Gaming M5. If you’ve been away from the hardware game for sometime, you’ll likely be shocked by the shear lack of components on the board. Obviously, you’ve got the usual array of VRM’s and connectors, but there’s an awful lot of “space” on the PCB – a sign of how many components are now integrated into modern day CPU’s such as Intel’s Skylake (bye bye North Bridge).
Starting from the top right side and moving down, the top is dominated by the 4x DDR4 slots which support memory up to 3600MHZ and the 24-pin ATA power connector and various fan headers, directly under those MSI gaming dragon adorns the south bridge (for those unfamiliar, a SB handles the Input/Out functions of a system, including USB and audio) and MSI provides x6 SATA GB/s and two eSATA, three more fan header and a Debug LED – your best friend when trying to pinpoint why your system isn’t POSTing (it also serves to tell you the temps of the CPU too when the board has POSTed).
Starting at the top left, the MSI Z170A Gaming sports a fairly packed rear IO panel, containing a PS/2 port, X2 USB 2.0 ports, a DVI-D and HDMI port, USB 3.1 Gen 2 and a USB 3.1 Gen 2 type-C, x4 USB 3.1, a LAN Killer E2400 and the audio ports along with S/PDIF-out. To the right of the IO you’ve the 8 pin ATX power connector (AKA the cable you forget to connect if you’ve opened up your PC), a Realtek ACL1150 chip (with Audio Boost 3 and Nahmic) and several PCIE 3.0 ports.
One major difference between this board and its bigger brother, the MSI z170A Gaming M7 is the absence of the “game boost” dial at the bottom right hand corner which allows for an easy way for newbies to automatically overclock their hardware with minimal hardware knowledge. For the M5, Game Boost is handled totally within BIOS – not a terrible concession by any means.
Out of all of these technologies, perhaps is M.2 will have the great impact; allowing home users to have access to far faster SSD speeds than ever before. As we highlighted in our Kingston HyperX Savage Review, SATA 3 drives have pretty much hit the maximum speed they’re capable of. This isn’t because the technology of SSD’s has hit its peak, instead the 6Gbps of SATA 3 just isn’t capable of keeping up with the drives. Skylake has changed this by introducing M.2; MSI have included two M.2 ports on the Z170A Gaming M5, with transfer speeds up to 64Gbps, a staggering ten times faster than the speeds SATA 3.0 is limited too.
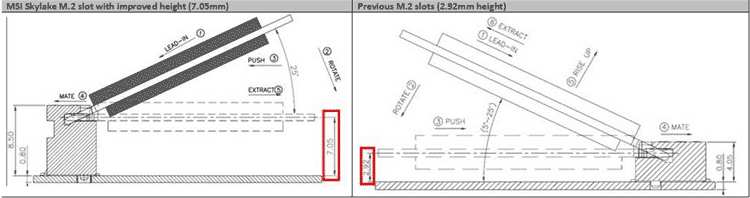
While M.2 is found in other platforms, including the slightly older X99, it’s the first time M.2 has found its way into parts designed for the mainstream and for gamer’s and power users, the advantages are obvious. MSI have also made a slight improvement to M.2 on their Skylake range, they’ve increased the height of the slots. The theory behind this change is to improve compatibility with future M.2 drives by giving additional space to physically larger drives. We don’t have a larger M.2 drive to test with, but MSI have told us that it shouldn’t impact your ability to install other parts around the drives.
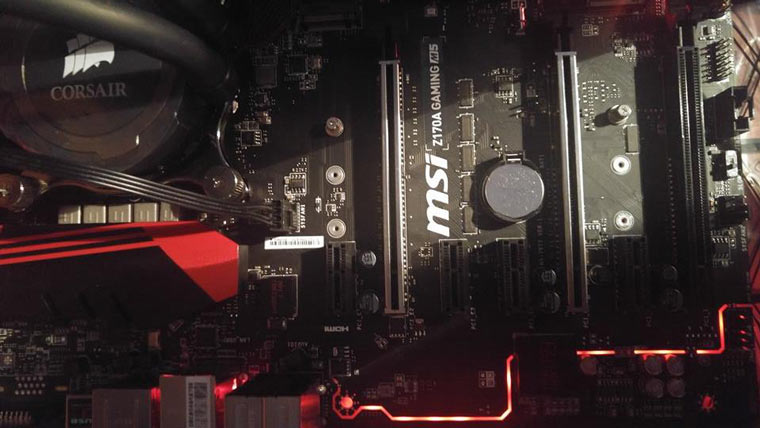
If you run a windows case, you’ll probably be interested to learn that the MSI Z170A Gaming M5 does have red LED strips across the rear part of the board which lights up when the system is powered on. Oh, and we forgot to mention – the BIOS reset lights up blue if you short it too, handy if you’re flailing around inside your computer case and unsure if you quite made contact with the two pins.
MSI Z170A BIOS and Software
If you were an overclocker “back in the day” and somehow were teleported to work on a modern system, you’d probably be shocked at how a PC’s BIOS has evolved. What was once home to familiar (but oh so user-unfriendly) grey and blue text has been replaced by a GUI which looks like something from early Windows. I can honestly say that MSI’s Z170A has one of the easiest and nicest BIOS front ends I’ve ever used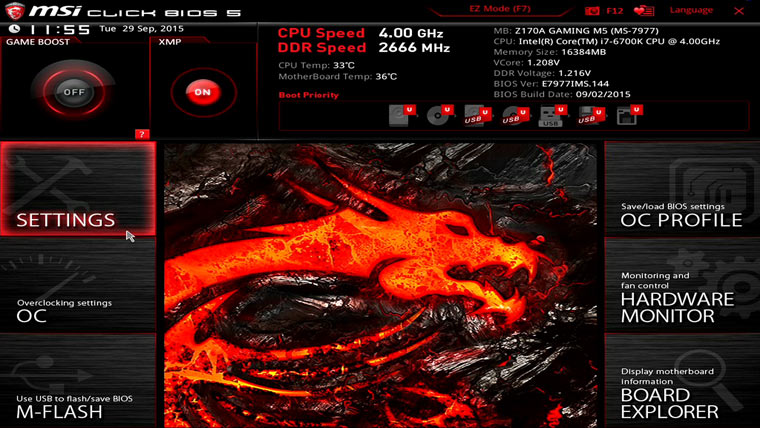 .
.
After mashing the “del” key to enter, you’ll be presented with a screen providing you an overview of the status of your system, including the CPU’s speed, memory clock speed, temperatures and voltages and a the ability to change boot order via a drag and drop interface. An easy overclock button labeled “Game Boost” sits at the top left, which cranks a 6700K to 4.4GHZ or a 6600K to 4.1GHZ automatically. To the right of that is the all important XMP button for quick and easy memory optimization.
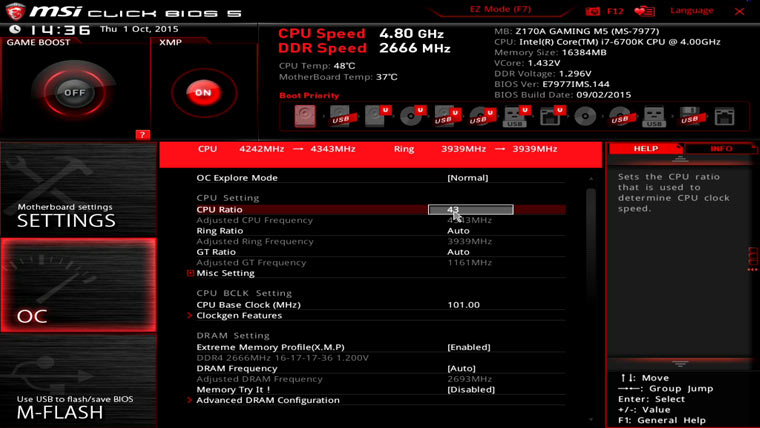
The BIOS contains the usual settings you’d expect, ability to enable / disable onboard devices, adjustments for the PCI system, legacy and security options – pretty familiar stuff. Overclocking is a separate section allowing you to either set “auto” or manually choose from a massive plethora of settings (all assuming you’re using an Unlocked CPU), including CPU ratio, ring ratio, base clock, memory profiles and frequency (and timings) and adjusting around a dozen different voltages, including the all important core voltage, core voltage compensation POLL OC and PLL SFR… basically everything you’ll need to push your processor to the limits.
The BIOS essentially has two distinct modes – the first is EZMode, which helps less experienced users through most of the functionality, and the second is Advanced, where more features are available and is probably what most power users will visit to tweak their settings.
Like many motherboard manufacturers, there’s Windows software which allows you to automatically various software components of your rig. MSI Live Update 6 allows you to update drivers for the motherboard (such as USB, chipset, audio…), the software (such as Command Center) and even provides functionality for updating the BIOS. While we’re more power users at RGT, it’s hard to argue with software that makes updating software less of a chore.
MSI Command Center
This utility software allows you to adjust the processors ratios, base clock, fan profiles, DRAM voltages and enable game boost (plus other things) directly from within a Windows based environment. We tested it out on a couple of different tests – taking the default 42 multiplier and pushing it to 44, and then pushing that to 45 and increasing the base clock to 102MHZ – all with no issues, crashing and everything seemed nice and stable.
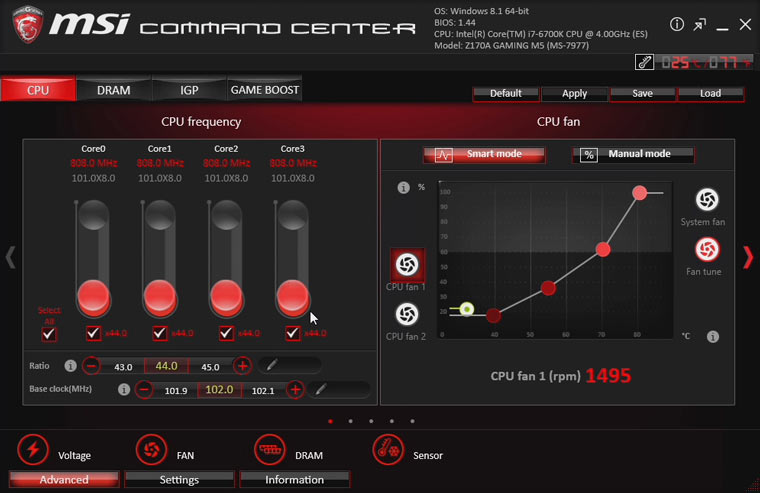
This software isn’t necessarily built for overclockers who’re looking to set world records, but for gamer’s or power users who want to make quick adjustments to their settings, or quickly enable / disable MSI’s Game Boost. We see it being particularly handy for those who either stream, encode video or otherwise push a heavy load on their system for just an hour or two at a time, as you can make your tweaks and get back to work quickly.
Test Setup and Methodology
For the purposes of this test, we’ll be running a Skylake 6700K, the MSI Z170A Gaming M5, 16GB DDR4 in two configurations (with tests conducted with Crucial Ballistix 2,666MHZ), see below for testing with a 4 stick kit however., a Radeon R9 290X, a Kingston HyperX Fury 240GB SSD which will house our main OS (windows 8.1) and of course all of the latest and greatest drivers for the relevant pieces of hardware. All video results will be captured by a secondary system with dedicated capture hardware to ensure that the performance of the test rig isn’t affected. Gaming resolutions are kept lower because we aren’t trying to push the R9 card, instead we’re focusing on the performance of the systems CPU, motherboard and RAM.
CPU and Bandwidth Focused Testing
For the sake of comparison, we’ll be pitting the MSI Z170A Gaming M5 (along with the 6700K) against several common desktop configurations, an AMD FX 8350, a Haswell I7 4770K and the gamer’s favorite, the I5 2500K Sandbridge (a platform I suspect who’re reading this are considering an upgrade from). The CPU tests will focus on tests which stresses just the CPU, Motherboard and RAM and doesn’t put load on the GPU.
7-zip
Starting out with 7-zip, which is used for file compression or decompression. It’s highly multithreaded, with a focus on Integer workloads, but removes the IO system from the workload (in other words, the test isn’t reliant on the SSD for data throughput). The built in benchmark uses the standard 32MB setting. The 26,015 MIPS, dominating the 4770K (at 4.1GHZ) which scored 23,930 in this test.
| Intel I7 6700K | 26642 MIPS |
| AMD FX-8350 | 23272 MIPS |
| Intel I7 4770K (OC to 4.2GHZ) | 23930 MIPS |
| Intel I5 2500K | 14392 MIPS |
CineBench Version 11.5
CineBench 11.5 is a staple of any processor testing suite despite its relative age. As one would expect, just like the 7-Zip test, the I7’s steal the show because of the highly multithreaded nature of the software. AMD’s FX 8350 finishes between both the 2500K and the 4770K, with a score of 6.9, but the 6700K hits 10.10 points on the nose.
| Intel I7 6700K | 10.10 |
| AMD FX-8350 | 6.9 |
| Intel I7 4770K | 8.12 |
| Intel I5 2500K | 5.4 |
CineBench Version 15
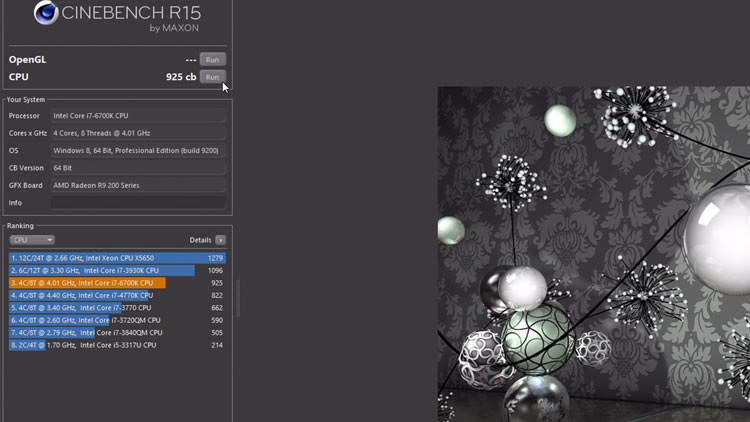
Finishing off the CineBench is version 15 and the positions of the processors hasn’t really changed, with the 6700K striding in front of the pack at over 920 points.
| Intel I7 6700K | 925 |
| AMD FX-8350 | 639 |
| Intel I7 4770K | 791 |
| Intel I5 2500K | 592 |
Sisoftware Sandra 2013
Processor Arithmetic – I think it’s pretty self explanatory: how fast can the processor calculate maths. A similar story as above – the FX sits right between Intel’s older choices while the I7 6700K Skylake and the MSI Gaming steal the show with massive throughput and performance. It turns out that Skylake is quite good at maths!
| Intel I7 6700K | 123.54GOPS / 188.81GIPS |
| AMD FX-8350 | 76.72GOPS / 105.75GIPS |
| Intel I7 4770K | 94.33GOPS / 123.78GIPS |
| Intel I5 2500K | 50.8GOPS / 87.2GIPS |
And now Sisoft’s Sandra’s Multi-Media benchmarking:
| Intel I7 6700K | 534.89 Int X32 / 508 Floating Point / 294.4 Double X8 |
| AMD FX-8350 | 321.69 Int X32 / 200.42 Floating Point / 112 Double X8 |
| Intel I7 4770K | 401.11 Int X32 / 393.98 Floating Point / 226.11 Double X8 |
| Intel I5 2500K | 157.4 Int X32 / 198.9 Floating Point / 113.9 Double X8 |
Gaming
You might notice our gaming tests are a little thin on the ground – and this is primarily due to games being GPU bound instead of CPU bound. We have selected two games which scale rather well with extra CPU power, and also come with their own built in benchmark to ensure consistent results. Testing other games such as Shadow of Mordor and GTA5 showed very little difference in frame rates because they were so GPU bound and we lacked a second R9 290X for crossfire testing.
Thief:
There was a lot of criticism with the launch of Square’s Sneak’em up, gamer’s didn’t appreciate the smaller and tighter levels, instead preferring the greater freedom and flexibility of the original series. We used AMD’s Mantle API to push the processors multi-threading, Intel 4470K hit 96.4 FPS while the 6700K reached an average of 114 FPS. Perhaps the most telling difference was the ‘lowest’ frame rate, 69FPS on the 4770K while the Skylake powered MSI Z170A Gaming M5 managed 86.5 FPS, a rather considerably difference.
Tomb Raider
From a personal standpoint, I loved Tomb Raider, despite wishing it had just a few more puzzles for Lara to explore. For the benchmark, we ran everything at the highest settings at 1080P, with TressFX enabled – but we disabled any in-game anti-aliasing. The end result is the I7 4770K achieved an average of 77.9 while the newer Skylake 6700K hit 90.1 FPS. Lowest frame rates rose from 58 to 66 FPS with the Skylake upgrade.
Dolphin Emulator Benchmark
The beauty of this benchmark is that it places an extreme load on the processor, forcing it to raytrace a scene. Because the application only pushes workload onto a single processor core, it’s a great demonstration of single core performance. For a point of comparison, Nintendo’s Wii could complete this task in just under 18 minutes!
| Intel I7 6700K | 6 Minutes 37 Seconds |
| Intel I7 4770K | 7 Minutes 43 Seconds |
| Intel I5 2500K | 9 Minutes 23 Seconds |
Memory Matters
When we were detailing the specifications of our test rig, you might recall we were fairly vague when we mentioned “DDR4 memory”. That’s because we decided to test MSI’s board with a couple of sets of memory. The first being two sticks of 8GB (16GB total) – Ballistix by Crucial which runs at 2,666MHz CL16 1.2V. The second set is a set we were sent by Kingston. Kingston’s RAM is the HyperX 16GB (4x4GB) also running at 2,666MHz CL15.
So, how does the board handle four sticks of RAM? Easily – that’s how. We noticed no instability while running the four sticks, and actually we experienced slightly faster results thanks to the tighter timings at play on Kingston’s HyperX series.
The Z170A Gaming M5 easily dealt with us switching between the two sets of memory – simply switch off the system, replace the memory, turn back on and then press the “XMP” button once again in BIOS and you’re good to go.
Overclocking the I7 6700K on MSI M170A Gaming M5
Overclocking with MSI’s board can be as simple or complex as you’d like to make it. At the easiest level, you can simply click the “game boost” button (either from within Windows or BIOS) to provide you a no fuss increase in frequencies. Experienced users would be best suited tweaking clocks and voltages for themselves with the myriad of available BIOS options. It goes without saying that if you’re looking to push serious clocks (especially over 4.5GHz) you’ll be wanting a decent water cooling solution (such as a Corsair AIO) as temps can quickly start building up. In terms of voltages, you’ll probably not be wanting to push more than 1.45v on vCore (unless you’re running some serious cooling).
With the Kingston HyperX memory (so that’s four sticks of 4GB) we cranked the speed from the factory standard 2,666MHZ and pushed to 2,900MHz, and even left the voltages alone while doing so. What’s rather impressive about all of this was that from within Windows, using MSI’s Command Center we pushed the clock speed to over 4.6GHz in the space of 20 seconds (just tweaking the basic settings) demonstrating how easy you can make overclocking on modern hardware if you’re not trying to reach the “best settings”.
Using a little tweaking from the BIOS, we managed to reach a rather respectable 4.8GHz; gaming scores didn’t really seem to change too much however – likely because most games are GPU bound, especially at higher resolution (think 4K). This is particularly true for games such as GTA5, as enabling GPU intensive effects does little to alter the frame rate, the same could also be said for Shadow of Mordor. This might well be a different story if you’re running a high end crossfire or SLI setup (say R9 290X or a GTX 980 or above).
Productivity tasks however increase how you would expect at a given clock speed. For example, our 7-Zip scores increased from 26,642 to 29,852 and our CineBench R15 scores shot up over 100 points, from 925 to 1,067.
Nahimic Audio
MSI’s Nahimic which originated in their all in one PC’s and then found its way to their gaming laptops and now motherboards. Essentially, it claims to boost the audio quality of both captured audio (in other words, from a microphone), improve audio quality and also enables virtual 7.1 surround sound on standard stereo equipment. Unfortunately. we weren’t able to capture the audio through the speakers (as we’re using lossless HDMI, and lack the converters required to setup audio capture from standard audio jacks) but we did test out the microphone capture for you on our video review.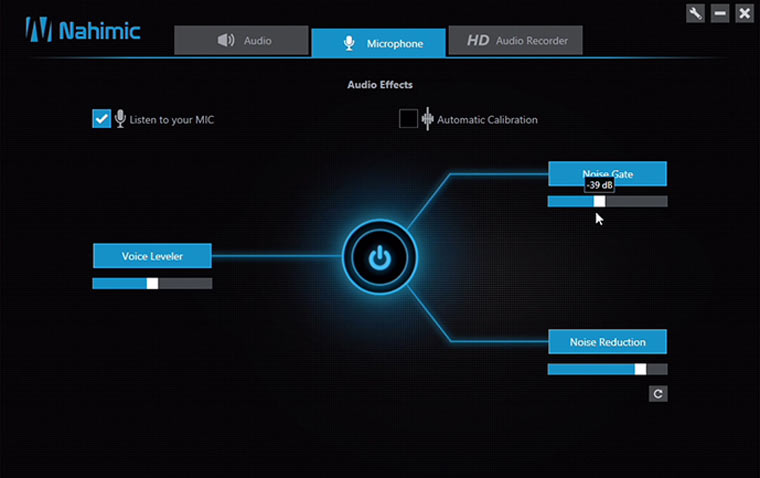
On the Microphone side of things, we used a low end lapel microphone as we figured it’d be the best test of the hardware and then tried various scenarios while toggling Nahimic’s various modes on and off. While our tests weren’t super scientific there was certainly a difference in the audio quality, particularly in the levels of background noise. How much of a difference it will make in your ‘average’ gaming sessions will fall on the type of environment you’re playing in. For professional commentators, audiophiles and pro gamer’s I can certainly see an advantage. Particularly for those of us cursed with a squeaky desk chair.
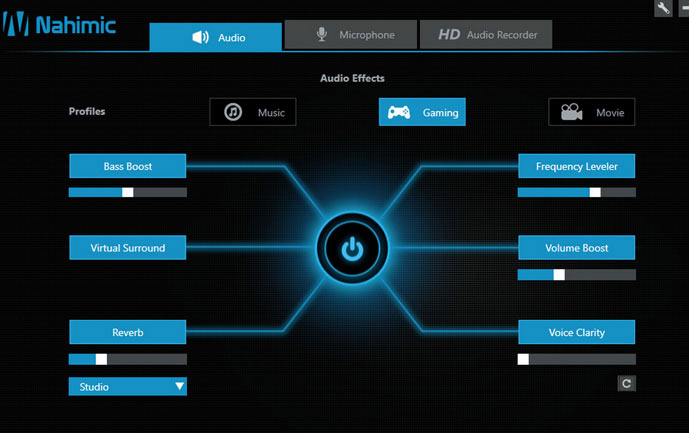
From the point of view of “listening” to game / audio with Nahimic, We here at RGT quite like it – but it’s clearly subjective. Effects seem sharper and more distinguished. I suspect your audio (speaker or headphone quality) will have quite an impact on Nahimic’s performance, along with personal preferences.
For more information on Nahimic, feel free to checkout MSI’s own video on the subject matter.
https://www.youtube.com/watch?v=f1RUxPdWNH4
MSI Z170A Gaming M5 Verdict
If you’ve read through this entire review by now, you’ll probably get the hint we’re quite the fans of MSI’s Gaming M5. It represents the third iteration of MSI’s mid-range gaming focused boards and a beautiful combination of aesthetics and functionality. Many of the things we love about the board are little touches, such as improvements to the height of the M.2 slots, ease of BIOS navigation and easy access to fault codes.
It’s clear MSI have put a lot of thought into the design of the board, and in our testing it has been completely and utterly rock-solid. The only crashes in sight when we were playing around with overclocking and trying to keep voltages as low as humanly possible (in other words, caused by the user). The built in audio of the Z170A Gaming M5 is pretty impressive too – particularly for Microphones, the removal of background noise (particularly given the quality of the mic we were testing with) was damn impressive. I did notice a slight lack of bass from Nahimic, but this could easily be attributed to the speaker setup we were using (not our usual gaming setup) and could probably be fixed with a bit of bass offset if we played around with it. Sound effects however sounded great, and an impressive piece of technology in its own right.
For the price point of around £140 pounds (around $180 dollars according to US Amazon) it’s hard to argue about the shear amount of performance you’re getting. If you’re shopping around for a Intel Skylake motherboard, we’ve no qualms recommending MSI’s Z170A as your systems backbone.
Intel Skylake Verdict
Intel’s Skylake is a clear advancement over Haswell primarily on the back of its technologies more than its performance advantages over the older platform. DDR4, M.2, improvements to USB, improved tweaking for overclocking are all excellent reasons you should consider making the jump to Skylake. The only problem Skylake is facing is that Intel have priced it very closely to the X99 platform, and you can pickup a decent X99 motherboard for about 160 – 170 pounds. The pricing of the 5820K is currently cheaper than Intel I7 6700K leading to a rather puzzling turn of events – sure, Skylake has a clock speed and therefore single thread advantage (and overclocks like a demon), but X99’s extra core count isn’t a bad thing at all.
It’s arguable that the best value for money Skylake setup comes from the 6600K, which is currently available for a snip under 200 pounds. Sure, you’re losing out on the extra threads courtesy of Intel’s Hyper Threading, but for gaming, you’ll probably not notice the difference for a couple of years. It’ll take at least 1 – 2 years for developers to push games out which are totally CPU taxing, and even then you’ll probably find throwing the extra cash into a beefier GPU the better course of action. It’s horses for courses, and the 6700K is a fantastic processor in its own right, and we’ve loved our time with it – but it’s just not the clear winner it would have been if it had been priced £50 cheaper.
For those who’re just looking to game (particularly because of the number of PCIe lanes available, plus M.2 and so on) upgrading from an older processor (particularly the Sandy Bridge lineup) is compelling, and let’s face it, we’ve got to wait until this time next year to see what either AMD or Intel have in store for us!
Please note – this is NOT a sponsored review, while we were provided a review sample (RAM, Processor and Motherboard) they have since been returned to MSI. All opinions in this article are our own and this is our honest opinion based on the time we’ve had with the Z170A Gaming M5.
[schema type=”product” url=”https://redgamingtech.com” name=”MSI Z170A Gaming M5 and Intel Skylake I7 6700K Processor” description=”In this article we review MSI’s Z170A Gaming M5 Skylake motherboard with Intel’s I7 6700K. We tackle overclocking, take a look at Nahimic audio and benchmark against a variety of other hardware.” brand=”Z170A Gaming and Intel Skylake” manfu=”Intel and MSI” ]
If you’re from the USA, you can buy these items at these links: Intel Boxed Core I7-6700K 4.00 GHz 8M Processor Cache 4 LGA 1151 and MSI Computer ATX DDR4 Motherboard Z170A GAMING M5.
If you’re from the UK, you can buy these items at these links: Intel Core i7 6700K Processor (4 GHz, 4 Core, 8 Threads, 8 MB cache, LGA1151 Socket Box) and MSI Z170A Gaming M5 Motherboards.