Few can argue the influence the original Tomb Raider (and Lara Croft) had on the video games industry in the 90’s. While since then she’s appeared in a variety of different adventures, the original Tomb Raider, released in 1996 arguably had the largest impact.
Enjoying the original Tomb Raider’s (1, 2 and 3 for the sake of reference) is more than possible on a modern OS, such as Windows 7 or 8, and you can do so with 1080P (or higher) resolutions and use a gamepad too, while you’re at it.
Back when the original game hit store shelves, the PC didn’t have the pixel pushing monsters that we have now, and really the title was written to take advantage of Glide. Glide was a proprietary API written by 3DFX (who’ve since been eaten by Nvidia). So to enjoy 3D accelerated goodness we’ve got a few extra steps to follow. Unlike the 2013 retelling of Lara’s origin’s, you don’t have TressFX and super HD textures (check our Tomb Raider PC vs PS4 comparison here), but the tombs you’re raiding still have designs which hold up to this day.
Firstly, you’ll need to pick up a copy of Tomb Raider. For sake of this guide, we’ll be using the version available on GoG, and playing the original Tomb Raider. While many might say TR2 is the better title, I’m writing this article with rose tinted glasses, thank you very much.
Playing The Original Tomb Raider in 1080P Or Higher
1. Firstly, install Tomb Raider using GoG’s installer, nothing special here, just pick the location you wish to install the game, and follow the installer. But do not launch the game, we’ve got some work to do!
2. Follow this link (or if it’s broken in the distant future, open a new tab and google the application) and download the small utility known as nGlide. The application is tiny, weighing in at about 2.5MB.
3. Install nGlide, you can leave everything default here if you so desire. There’s no need to complicate things.
4. Launch nGlide’s configuration utility. It’ll be located in your start menu, or simply search “nGlide’ in your start screen in W8 if you can’t see it.
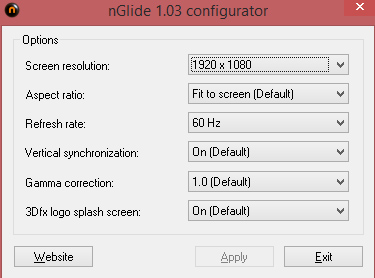
5. Configure your settings accordingly. Screen Resolution goes up as high as you need really, or you can simply select “desktop” if required. Aspect Ratio of “Fit to Screen” will ensure Tomb Raider (or any game really) will run at the correct 16:9 aspect ratio. I’d highly suggest V-Sync. Gamma is perfect as is, oh and leave the 3DFX splash screen on. It’s vital for sake of nostalgia.
6. Head to the location you installed Tomb Raider (hope you were paying attention earlier!). You’ll need to rename two instances of the same file. In the “Tomb Raider” directory look for a file by the name of “glide2x.dll” and rename it to anything, I chose the name “glide2x_bckup.dll”. Now, look for the exact same file name but this time in another directory, DOSBox. Doxbox is up one folder level in the default install, if it makes it any easier.
7. Load the game up and test it all works – with any luck, you’ll see the game running at your selected native resolution. The only issue is that the FMV sequences still look like garbage, purely because the resolution they’re rendered in. There’s nothing to be done about that though, sorry!
Getting a Controller working on the original Tomb Raider
If you’re happy to play on the default Keyboard controls, then you can stop right here and play the game. But for those who don’t want to be forced to play with Keyboard (no mouse support either) you’ll need to do one last thing. It’s not difficult though!
1. Download JoytoKey (or an alternative, there are a few similar applications, like MotionJoy or Xpadder). Once it’s downloaded, you’ll need to extract it and then run the .EXE.
2. Start binding your buttons that you wish to use on the keyboard to the joystick. If you’re unsure what say “button 1” is, then simply press the button on the joypad and it’ll highlight. We’re using An Xbox 360 (USB wired) pad for the sake of reference. The game actually defaults to support four buttons on the controller. So (and this is a bit complicated) I personally bound 4 buttons in game (to jump, action, look and draw weapons… on the 360 controller that’s A,B,Y and X) and bound the remaining buttons to keyboard controls.
3. Currently, if you load the game up with a joypad the menu will spin and you can’t select anything. That’s bad, and to fix it – In the Tomb Raider directory, look for the file dosboxTR.conf and then search for the section that says “joypad”. There’s a help section at the top (you’ll see it’s commented out with #’s) so ignore that, but under it you’ll need to change the joypad values according to your setup.
joysticktype=auto
timed=false
autofire=false
swap34=false
buttonwrap=true
The “timed=false” is the value which stops the Tomb Raider menu spinning around.
4. Load Tomb Raider up, and if necessary use the build in keyboard configuration (user controls) to match up the correct buttons you wanted for the action.
5. Play the game!
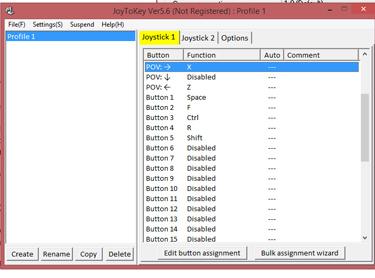 The above image is a demonstration of how to bind buttons. But please remember to read step 2 as you might (depending on your version of TR and setup) have four buttons available on the pad by default.
[schema type=”product” url=”https://redgamingtech.com” name=”Tomb Raider Original 1996″ description=”How to get the original Tomb Raider (and its sequels), released in 1996, working on Windows 7 and 8, in 1080P or higher, with 3d acceleration and with a joypad!” brand=”Tomb Raider” manfu=”Core Design” model=”Tomb Raider Original 1996 PC” ]